Showing posts with label cake. Show all posts

Thursday, March 8, 2012

Chocolate cake and marzipan roses.


I came across some interesting silicone moulds on Ebay, in the listing said they were for fimo clay and also "food safe"..... hmmm!!!!! "ooooooh rrrrrreally????" I thought to myself and a sudden smile shone on my face... I got a castle mould and then I saw a very pretty rose one... lots of ideas came flashing through my mind so I got it....oh yeah....you have to listen to your inner self! hehe.

I cleaned the mould with warm soapy water, grabbed a pack of marzipan, some food coloring and started tried the moould first with a little piece of marzipan.....ooh la la mon chéri!

Isn't this gorgeous?

Ideal to decorate cakes, cupcakes, to give away to friends....I just loved it loved it loved it!...

I wanted to try a recipe from my super-duper guide book "Cakes to Inspire and Desire" by Lindy Smith. So I tried the chocolate cake recipe using a 6 inch cake tin...

What do you think?...

Let's have a piece now...shall we?

Hmmm!!!! the smell of chocolate was incredible....

Absolutely delicious!

Oops! sorry....all gone! :-)

Monday, February 6, 2012

My son's birthday and a very special cake


Last year, right before my son's birthday, I was feeling poorly so I had no energy to spend decorating a cake... I did manage to bake one though, but the decoration was far from what I wanted. This time it was different so I carefully planned ahead... yay!.

Ever since my son watched the Queens Birthday parade in 2010, he has been obsessed with marching and has learned all the movements, posture and even commands!, I bought a costume that he wore out, and then...as I saw he was still interested, I bought a better costume and he absolutely loves it (see him on picture to the above)....

So his cake had to be related to his passion :-)

For the first time, I have taken pictures of all (nearly all) the steps I have gone through. I hope you find it helpful and please don't hesitate to contact me if you want to know something in particular that I haven't covered here.
I'm not a professional decorating cakes, this is merely a hobby that I really enjoy.
Working with fondant is tricky, it takes quite a lot of practise and patience! especially when covering cakes.

I baked 2 madeira cakes using a 7 inch tin. This is a firm sponge that lasts 2 weeks. Ideally you take 1 week to decorate it and then there's a week to eat it.

Recipe for a 7inch/18cm round madeira cake:
Recipe taken from the book "Cakes to inspire and desire" by Lindy Smith (my only guide!)

Ingredients:
-225 gr unsalter butter
-225 gr caster (superfine) sugar
-225 gr self raising flour
-125 gr plain flour
-4 large eggs

1. Pre heat the oven to 160C
2. Grease and line the cake tin with baking paper (bottom and sides)
3. Cream the butter and sugar in a large mixing bowl, until light, fluffy and pale. Sift the flours together in a separate bowl.
4. Beat the eggs into the creamed mixture, one at a time, following each with a spoonful of flour, to prevent the mixture curdling.
5. Sift the remaining flour into the creamed mixture and fold in carefully with a large metal spoon. Add the flavouring, if using ( I added some vanilla extract).
6. Transfer to the lined tin and bake for 1 hour or 1hour and 1/4. (Mine was ready in an hour)
when the cake is ready it will be well risen, firm to the touch and a skewer inserted into the centre will come out clean.
7. Leave the cake to cool in the tin then, leaving the lining paper on, wrap the cake in foil or place in an airtight container for at least 12 hours before cutting, to allow the cake to settle.


The sponge is firm enough to stand the weight of the fondant decoration, its moist and yummy!.

After baking the cakes, I covered the cake board with fondant.

I really like the Dr.Oatker Regal-Ice.
I used red food color (gel), I rolled it and placed it on top of the board.
To stick the fondant to the board, you can spread a thin layer of buttercream on the board first, or a thin layer of jam (this is what I did).
Before the fondant dried, I used a small cookie cutter to decorate the border, it looks really nice!.


The fondant on the board has to be dried before you place the cake on top, so leave it overnight in a dry and cool place.

As I'm always afraid of dry cakes, I add a bit of syrup to the sponge before spreading the filling. Add a tablespoon of sugar and 2 tablespoons (or a bt more) of water to a small sauce pan over medium heat, wait untill the sugar has dissolved completely, remove from the heat and let it cool.

Carefully remove the parchment paper from the cake. Level the top with a serrated knife.
Cut the cake in 3 layers. Place a thinner cake board, an inch smaller than the cake diameter (aprox) over a flat board covered with cling film, spread a bit of buttercream over the board and place the first cake layer over it. Using a straw make several holes in the sponge, then add a bit of the sugar syrup to the cake layer using a spoon.


For the filling I used buttercream. After you've added the syrup, spread some buttercream over, followed by another cake layer, poke with the straw, add some syrup, spread the buttercream and cover with the last layer.

Using a metal spatula, cover the top and sides of the cake with buttercream. To smooth the buttercream on the cake, put the spatula under hot running water, then pass it again over the cake, top and sides (a turnable table is very useful for this, I use an Ikea wooden turnable plate).


The idea is to make the buttercream as even as possible to avoid bumps under the fondant.
Unfortunately I couldn't take pics when I was rolling the fondant to cover the cake. I used 2 packages of the Dr. Oatker Regal-Ice, I kneaded it first. Add some "Trex" (vegetable fat) to the surface where you are going to roll the fondant, so it doesn't stick, add some Trex to the rolling pin as well and to the palm of your hands. Roll, lift gently, roll again untill you have reached the right size for your cake.
To make sure the fondant will cover the whole cake, measure the hight of the cake (x2), the diameter and add it up. For example, if the hight of the cake is 3 inches (x2) = 6 inches, diameter is 7, so 6+7= 13 inches. I would add a couple of inches just to make sure everything is ok!, so lets make it 15.
The rolled fondant should be at least 15 inches in all directions, when you've achieved this, gently lift the fondant and place it on top of the cake, gently press on top and lift the sides carefully to avoid craks, pass your hand around it then use a cake smoother to go around the top and sides, making sure there are no big creases.
After you're happy with the result, cut the excess with a sharp knife.

Take the second cake, cut the layers and using a big round cookie cutter, cut 3 circles, to create the second tier. Follow the same steps. Leave both cakes overnight as the fondant has to be dried before you assemble the cake and before any decorations.

Spread some buttercream to the centre of the cake board (red one with the stars).Use a metal spatula to help you lifting the cake and carefully place the first tier on top.
Gently mark the diameter of the second tier on the first one using a little sharp knife.
From that border go 1 inch toward the centre and make 4 marks (making a square), you'll place the dwells there. They are necessary to make 2 tier cakes as they give support to the second cake, otherwise they sink like the Titanic....and we don't want that, do we?.

You'll need now 4 wooden dwells. I bought a long one at B&Q, 5mm thick and cut one piece first, of 3,5 inches high, sharpen one end and push it gently through one of the marks, this is just to check the length of the dwell, the idea is to see it level with the cake surface. You may need to cut a bit more. Take it out carefully and use it to mark the other wooden dwells you'll use, so they have the same length.


After you have cleaned them, proceed to put the wooden dwells in the cake.


When all the dwells are in place, spread a bit of buttercream and carefully place the second tier on top.
Now to have fun decorating the cake!... as I said before, I already knew what I wanted to do, made a few drawings and took some measurements to place every bit into place.

You can see on picture #1 and #2 the joint between two stripes of fondant....what you can do....(that I unfortunately forgot!) is, damp one of your fingers and gently rub it where the joint is, the fondant gets softer so you can easily make that line disappear.
On pic #3 you can see I added the red triangles and before they dried, I used the same cookie cutter I used for the cake board, and pressed it to leave a star shape.

To stick the decorations to the cake, I make my own edible glue using "Tylo powder". If you don't have it, you can use vanilla extract instead.
To do the stripes on the second tier cake, I used a "sugarpaste gun", check it out here. It is a lot of fun to use it!. Compare prices before you buy one.


Here you can see the stripes:

I wanted to paint the stars with gold luster, but it didn't work the way I thought, so then, using white sugarpaste, I cut out some star shapes and stuck them over it.

With the same sugar paste, I modelled a little soldier and a small base to place the candle.
My original design didn't include the name letters, I added them at the end. Its good to plan your cake but you'll see along the way, that you can make some modifications and that's ok.

My son loved the cake!!!


I hope this "tutorial" was clear enough as it is the first time I make one!
Thanks for visiting :-)

Friday, January 20, 2012

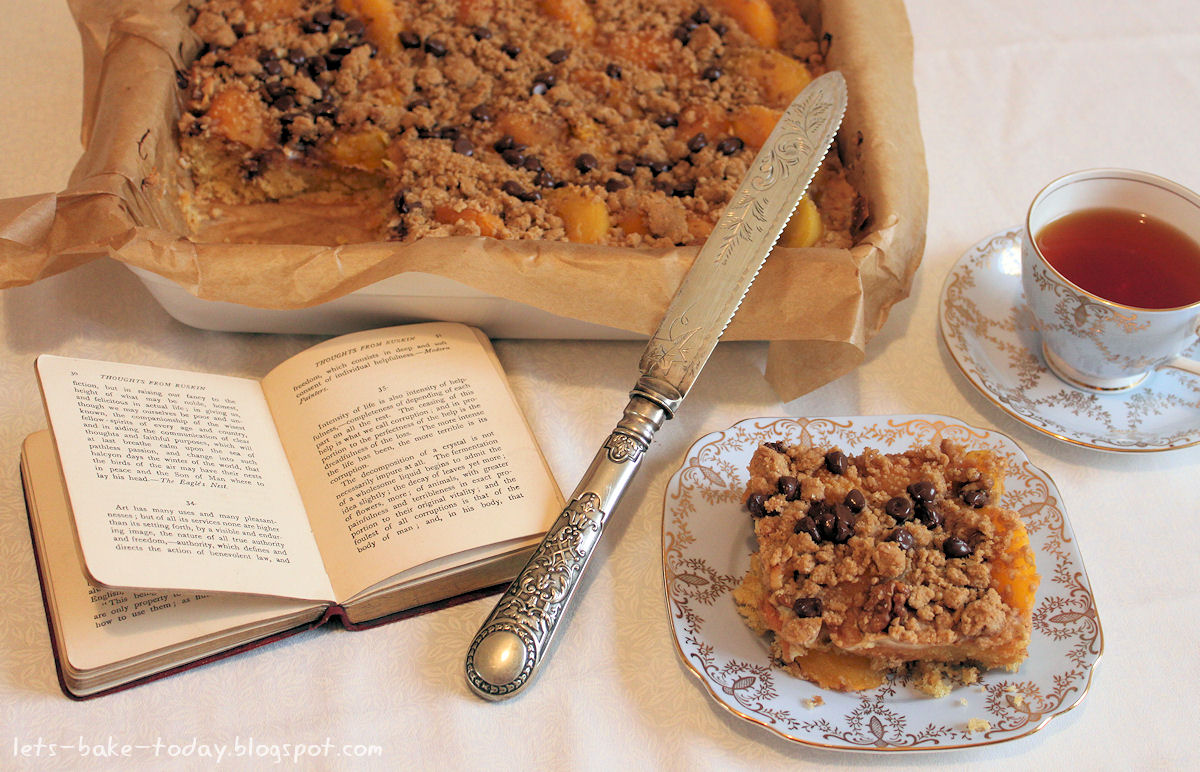
Peach and Apricot Crumble Cake

Its been a rainy day and as I always say: "Rainy day = Baking day". I already had something in mind... that crumble cake I have made a few times this year. The recipe is from a BBC Good Food magazine. I have modified it a bit and I have to say, this is the best crumble cake I have made so far....so why don't you try it?....believe me....you won't be disappointed!.

Ingredients:
-200 gr butter, softened
-225 gr golden caster sugar
-225 gr self-raising flour
-1 tsp baking powder
-3 eggs, beaten
-2 tbsp milk
-150 gr pot vanilla yogurt
-220 gr apricots from a tin (drained)
-200 gr peach slices from a tin (drained)

For the crumble
-30 gr butter
-5 heaped tbsp self-raising flour
-4 tbsp demerara sugar
-1tsp ground cinnamon
-A handful of walnut pieces (optional)
-A handful of chocolate chips (optional)

1. Line an oblong traybake tin (21 x 30 cms) with baking paper and heat the oven to 180C/fan 160C/gas 4. Beat the butter, sugar, flour, baking powder, eggs and milk together until creamy. Spoon into the tin, level the top, then bake for 25 minutes until almost set.

2.Meanwhile, get the yogurt and fruit at the ready and make the crumble by rubbing all the ingredients together, except the walnuts and chocolate chips.


3. When cake has baked for 25 minutes, whip it out of the oven. Working quickly, spoon over the yogurt, scatter over the fruit, then top with the crumble. Sprinkle the walnuts and choc chips on top. Return to oven for 15-20 minutes until a skewer comes out clean.

Serve warm as pudding, or cooled and cut into squares with tea.
This cake will keep int he fridge for a couple of days.


Variation: You can certainly use nearly any fruit, I have tried it with peach and pears and I'd love to try it with raspberries and blueberries in Summer.

Wednesday, August 17, 2011

Easy evening cake

I wanted to bake today, I fancied something sweet, but simple and quick to make... and I also wanted to use some mascarpone I had in the fridge.


I made a simple sponge based on the ever versatile recipe I have used lately for the cupcakes. But instead of using paper cases, I put the mix into a 8" tin and baked for 25 minutes instead of 15 and I added a teaspoon of pure vanilla extract instead of orange zest. Great result!!!


For the frosting was mascarpone cheese mixed with cocoa powder, sugar and a drop or two of pure vanilla extract... mix mix mix and then spread over the cake with a spatula. Then I sprinkled some chocolate spaghetti (from Morrisons)....and that's IT!

So, the recipe:
Ingredients:
-350g plain flour
-1 1/2 tbsp baking powder
-140g caster sugar
-1/2 tsp salt
-2 eggs
-250ml milk (I used semi-skimmed and it worked well)
-1 teaspoon of pure vanilla extract
-85g butter, melted

Method:
1. Preheat the oven to 200°C/Gas 6/Fan oven 180°C
2. Line a round 8" deep tin .
3. Sift the flour and baking powder into a large bowl, then stir in the sugar and salt.
4. Beat the eggs and milk together in a jug or bowl, add the pure vanilla extract, then stir in the butter and gently mix into the dry ingredients to make a loose, slightly lumpy mixture. Do not overmix or the cake will be tough.
5. Fill in the tin
6. Bake for 25 minutes until well risen and golden on top.
Allow the cake to cool for 15 minutes in the tin, then carefully remove and place on a plate.
7.Put the mascarpone cheese in a small bowl, add a tablespoon of sugar (You can use less or more, up to you), a teaspoon and a half of cocoa powder, a couple of drops of vanilla extract (optional), then mix well, you can use the electric mixer if you want. Spread over the cake with a spatula and sprinkle chocolate spaghetti or any other on top.

Enjoy!!

Saturday, May 7, 2011

Chocolate and mango layer cake

When I started trying new recipes and after a few disasters, my lovely neighbour and friend came to see me, she said "I have something for you" with a big grin on her face that made me smile... she gave me a small but very consistent book called "Chocolate & Baking"...hmmm! it sounded fabulous....just what I needed!, 508 pages of great recipes, couldn't be a better present!. I have tried a few and they're really good....almost as good as "BBC Good Food".
I mrked all the recipes I wanted to try, all too many I suppose, but someday I' will try them all, yay!.
One of those recipes I marked with a bit of paper, was this one....and OMG is good!. This is probably the fifth time I make it, but the first time I take a picture of it.

The sponge is very firm, so after trying it so many times, I decided to pour a bit of the mango juice mixed with sugar, on the sponge layers before I put the filling.
The original recipe doesn't add any sugar to the cream and mango mixture, but I have done (1/2 cup of sugar) otherwise is not sweet at all.

Ingredients:
-50g cocoa powder
-150ml cup boiling water
-6 large eggs
-350g cup caster (superfine) sugar
-300g self-raising flour
-2 x 400g cans of mango
-1 tsp cornflour (cornstarch)
-425ml cups double (heavy) cream
-75g dark flock chocolate or grated chocolate

1. Grease a deep 23cm/9 inch round cake tin (pan) and line the base with baking parchment.

2. Place the cocoa powder in a small bowl and gradually add the boiling water; blend to form a smooth paste.

3. Place the eggs and caster sugar in a mixing bowl and whisk until the mixture is very light and foamy and the whisk leaves a trail that lasts a few seconds when lifted.
Fold in cocoa mixture.
Sieve (strain) the flour and fold into the mixture.

4. Pour the mixture into the tin (pan) and level the top.
Bake in a preheated oven, 170C/ 325F/ Gas Mark 3, for about 1 hour or until springy to the touch.

5. Leave to cool in the tin (pan) for a few minutes then turn out and cool completely on a wire rack.
Peel off the lining paper and cut the cake into 3 layers.

6. Drain the mangoes and place a quarter of them in a food processor and puree until smooth.
Mix the cornflour with about 3 tbsp of the mango juice to form a smooth paste. Add to the mango puree. Transfer to a small pan and heat gently, stirring until the puree thickens. Leave to cool.

7. Chop the remaining mango.
Whip the cream and reserve about one quarter. Fold the mango into the remaining cream and use to sandwich the layers of cake together.
Place on a serving plate.
Spread some of the remaining cream around the side of the cake. Press the flock or grated chocolate lightly into the cream. Pipe cream rosettes around the top. Spread the mango puree over the centre.

Saturday, April 23, 2011

Happy Easter! - Banana cake with choc chips


It's been quite a long time since my last post....I have made some cakes in between but didn't take pics due to bad light!.
It was my son's 3rd birthday in February, I made a lovely cake but I was sick and I didn't have the energy to decorate....so it was a very simple decoration, will post it later one :-)
Easter is my favourite holiday of the year, mainly because its the beginning of Spring time, my favourite season!. Quite simbolic as well, marking the beginning of different aspects of life, a rebirth if you want.
This time I improvised a cake and it turned out delicious!. I made a banana cake and added some chocolate chips....yum!!
I covered the cake with Betty Crocker's ready vanilla icing that I dyed pale yellow, I used dried coconut (dyed pale green) and finished the decoration with mini eggs and a rabbit silhouette made with card.
The cake went down a storm! so I'll definitely make another one and will change the decoration.

Here's the recipe:

Ingredients:
-2 1/4 cups all-purpose flour
-1 teaspoon baking powder
-1/4 teaspoon salt
-3/4 cup of butter (softened)
-1 1/2 teaspoons pure vanilla extract
-2 ripe bananas (mashed)
-3/4 cup sour cream (or full fat natural yoghurt)

Method:
1. Preheat oven 180 C
2. In a large bowl cream butter and sugar with electric mixer until light and fluffy.
3.In medium bowl, combine flour, baking powder and salt; set aside.
4. Add eggs, vanilla and banana (to mixture on step 2) mix well. Add flour mixture alternately with sour cream (or yoghurt); blend thoroughly but do not overmix.
5. Add chocolate chips or chopped walnuts (both delicious!) and mix with a big spoon.
Pour into a prepared tin (you can line just the base)
Bake for about 35-45 minutes, or until wooden skewer inserted comes out clean (top of the cake will be golden in color).
Cool for 30 minutes in the tin; remove and cool completely before decorating.

If you don't have time to dcorate, sprinkle icing sugar on top.

Enjoy as much as we did!!!

Tuesday, September 14, 2010

Citrus poppy seed cake

Every season is "cake season" to me so I'm always looking for new tempting recipes to try.
Not long ago I bought this little book: "Good Food 101 cakes & bakes" from Amazon, after reading all the excllent and convincing reviews. I have tried a few recipes and I have to say they are great!. This has been the only cake I managed to photograph so far because the other ones vanished before I could take my camera out of the bag! hahahahha...


Now, back to this cake in particular.....is very easy to do (you don't even need an electric mixer!) and 100% delicious. This has been the first of many more I'll make, no doubt!.
Here's the recipe:

Ingredients:
-175gr butter, softened
-175gr caster sugar
-3 eggs, beaten
-250gr self-raising flour
-50gr poppy seeds
-Grated rind of 2 oranges
-Grated rind of 2 lemons
-4 rounded tbsp natural yogurt

For the topping:
-250gr tub mascarpone
-Grated rind and juice of 1 small orange
-3 tbsp orange or lemon curd
-Grated rind of 1 lemon

Before I continue let me tell you that I only sprinkled some icing sugar on mine, I didn't use the topping from this recipe simply because I didn't have the mascarpone nor the lemon curd, BUT....I'll surely try it next time!.

Method:
1. Preheat the oven to 150C/Gas2/fan oven 130C.
Butter and line the base of a deep 20cm/8in round cake tin.
Using a wooden spoon, beat together the butter, sugar,eggs, flour, poppy seeds, citrus rinds and yogurt until smooth.

2. Spread the mixture in the tin and bake for 45-50 minutes until just firm. Cool in the tin for 10 minutes. Then turn out and cool on a wire rack. Peel off the paper.

3. Meanwhile, mix the mascarpone with enough orange juice to make a spreadable icing. Lightly swirl in the curd to give a marbled effect. Roughly spread over the top and sides of the cake, and scatter the grated citrus rind over the top to decorate.

Serves 10

Saturday, August 7, 2010

Flower Power Cake!

Jasmine's 18th birthday was coming and as I promised to her, I made the cake.
I was getting a bit nervous as I knew I needed more time to practice with fondant and at the same time I wanted to make a very special and beautiful cake for her.
I used to take tips from the internet, YouTube and so on, but for some reason it didn't seem enough help!. So I went to Amazon's and looked for cake decorating books....there are loads, difficult to choose!. I started reading the reviews of the ones I liked and that's how I ended up buying "Cakes to inspire and desire" by Lindy Smith....fabulous book! it has just the right and very clear information you need, good recipes and priceless tips. Although I still need to learn A LOT, her book helped me with the basics and gave me more confidence to try new things. I recommend it 100%!

I thought at first I was going to make a simple cake, and by this I mean, a "one tier" cake... but seeing the pictures in the book was very tempting so I gave it a go, following all the instructions in the book...2 tiers then!, it worked perfectly well.
I used a 7 inch round cake for the base and a 3,5 inch cake for the one on top, rather small but very cute!...here's the result!


As I didn't want to write on the cake to not spoil the flowers, I made this tag with fondant and used an edible ink pen to write on it, I think it looks great, what do you think?


In the book there's a list of useful tools....I was quite impressed with the "Sugar Shaper", which I had to get, I couldn't resist it!... and let me tell you, Squires Kitchen has the best price online! :-)

Zoe's cake

I made this cake for a very special girl, Zoe, who turned 7 in July.
I have to say, it was quite difficult to cover the cake with fondant, it's not easy at all, it takes a lot of practice I think, so I'll keep on trying!.

Saturday, May 1, 2010

Lemon gateau


I tried a recipe that I found in a magazine. The picture showing the cake looked terribly appealing to me, I couldn't resist!.

What's a Gateau?
A gâteau (pronounced ga-toe) is a French cake, often specifically a sponge cake that may be made from almond flour instead of wheat flour. In general terms, any cake in France may be considered a gâteau, but some French cakes are more gâteaux than cakes you might see in other parts of the world. Yet if you order any kind of cake in France, you will be ordering a gâteau.

Gateau is the singular word for cake and Gateaux is the plural word, although the pronunciation is the same.

Let's go to the recipe, shall we? :-)

Ingredients:
-Butter for greasing
-2 1/2 tbsp of semolina, plus extra for dusting
-6 large eggs, separated
-150 gr (5 oz) caster sugar
Link-2 large lemons
-40 gr (1 1/2 oz) ground almonds
-3 tbsp plain flour
-3 gelatine leaves (or 1 1/2 sachet of Vege-gel (from Dr Oetker) wich is the vegetarian alternative)
-150ml double cream

Method
1. Grease an 8cm deep, 20.5cm loose-bottomed round tin. Line base with baking parchment; dust sides with semolina.

2. Heat oven to 180C (160C fan) mark 4.

3. Beat 3 egg yolks + 50grs (2 oz) sugar + zest of 1 lemon for 5 minutes. Fold in semolina +almonds + flour.

4. Beat 3 egg whites until stiff. Add 25gr (1 oz) sugar and beat for a few seconds. Fold 1 tbsp into cake mix, then fold in the rest. Spoon into tin and level. Bake for 15-20 minutes. Leave to cool in tin.

5. Remove sides of tin and slide cake on to a board, leaving parchment in place.
Slice cake in half horizontally. Regrease and reline sides of tin with baking parchment.
Put cake half with paper attached into the tin, paper side-down.

6. Put gelatine in a bowl and cover with cold water. Leave for 5 minutes.
*If you're using Vege-gel, empty a sachet and a half into a small bowl and add 200ml of cold water, stir with a spoon until is completely dissolved, leave it for a few minutes.

7. Heat the juice of 1 lemon until simmering.
Squeeze excess water of gelatine, then whisk into the lemon juice. Leave to cool.
*Using the Vege-gel: pour the Vege-gel mixture into the lemon juice using a sieve, stir gently whilst on lowest heat for a couple of minutes, then leave to cool.

8. Whisk remaining yolks + sugar + zest of 1 lemon until moussey. Fold in the gelatine mixture.

9. Beat remaining egg whites until stiff.

10. Whisk cream until it just holds its shape.

11. Fold cream into yolk mix, then fold in egg whites.

12. Pour into tin. Cover. Chill for 2 hours in freezer.

13. Put second cake layer over the mousse, cut-side down. Cover and chill overnight.

14. Turn out cake and peel off paper. Dust with icing sugar and using a knife or a metal skewer score lines on top.

Good luck and enjoy! x

Saturday, April 3, 2010

Easter cake


I have been very busy recently, trying to get everything ready to put the house for sale... it seems like an endless task!. Tiring times but I'm sure it will be all satisfactory at the end.
I thought I wasn't going to bake anything for Easter as I have very little energy these days.... and here I am!...

I love Easter, more than anything because it's the celebration of Spring.

This cake: vanilla sponge, caramel and raspberry jam filling, covered with buttercream, marzipan letters and bunnies, mini eggs and silver balls....YUMMY!!!!!!!!!!!

Thursday, February 11, 2010

My son's 2nd birthday and a starry cake :o)

I was thinking about the cake I wanted to make for my son's birthday for quite a while.
It was very difficult to cover my first cake with fondant, but I can say I learnt a lot while doing it on my own and I hoped to improve the next time...and I definitely did!. I managed to get the right consistency for the buttercream that goes under the fondant. I used ready rolled fondant this time. It wasn't perfect coming out of the roll, it was cracked...but I fixed it.
I also made some cupcakes to go with it.
My son loved it!.


Tuesday, January 26, 2010

My first cake decorated with fondant!

I wanted to surprise my husband who was turning 50, with a special cake. I watched loads of videos on YouTube about cake decorating and specially about how to cover a cake with fondant. It seemed quite easy...or at least that's the impression I had!!!. I was very excited and looking forward to start my first cake.
I wanted to get the ready rolled fondant that you can find in almost any grocery store....but when I went for it, it was all gone!!!, so I got 2 packs of 500grs ready to roll fondant and thought it was worth to try and do it all myself.
The cake was ready, the layer of buttercream seemed to be just perfect....how exciting!!!!....then, I rolled the fondant, added the icing sugar so it wouldn't stick to the table....so far so good!!, I placed the fondant carefully on top of the cake and when I was trying to smooth the sides....oops! it cracked and then I had uncovered areas....oooh dear, complete disasterrrrrrrrrr!!!!!!!!!! I have to say, my heart sank!!, the cake looked horrible, impossible to take anywhere. I left it in the kitchen, I needed time to think, how can I fix it?...at first I thought that I could cover it again with another layer of white fondant....but it was going to be too much....then I thought....stripes to cover the sides....and I finally decided to use circles, using fondant as well....
This is the result:

I still need to learn a lot, but to be the very first cake I don't think it's too bad, what do you think?

This is what we had left...

I need to make another cake, for my son's birthday # 2, I already have some ideas, I just hope I'll manage to cover the cake properly!!!.
See you soon! :o)
Related Posts Plugin for WordPress, Blogger...